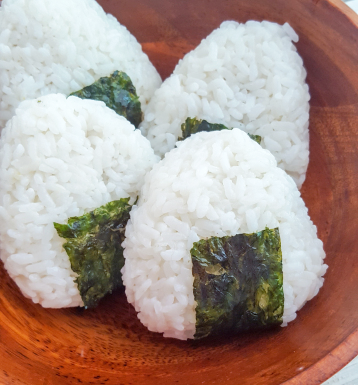

Onigiri is a Japanese snack/light meal made by stuffing small amounts of whatever you feel like inside of rice! They can be different shapes, but mostly triangular or round, filled or simply made with furikake seasoned rice.
We make these at least 3 times a week for quick and healthy lunches. We’re still trying to eat low cal and watching what we eat, and these round out to around 300 calories per serving. Perfect for a snack or light lunch!
The tuna variant is a more common version, and very easy to replicate at home! I highly recommend finding Japanese mayonnaise for this as it’s slightly sweeter and balances well with the tuna and miso. You can use white or shiro miso if you wish or can’t find aka, I just prefer it and always have some in the fridge.
These couldn’t be easier, really. The only tricky part comes down to forming them and I’ve got some tips!
What you need:
- 1/2 cup dry, short grain japanese rice, cooked
- 1 packet or small can of low sodium tuna, drained (74 grams)
- 2 tsp red or aka miso
- 2 tbsp Japanese mayo, kewpie brand
- 1 tbsp green onion, minced
- roasted nori, sheet or seasoned snacks
- First cook your rice and let it cool. You still want it to be barely warm when making these. Too hot or too cold will make it difficult to form them.
- Set aside rice and prepare tuna. Make sure tuna is well drained, too wet of a filling can seep through the rice and have your onigiri fall apart. Add miso, Japanese mayo, and green onion. You do not need to add salt, the miso does all the seasoning. Mix gently to incorporate but don’t over mix.

- With damp hands scoop 1/4 of rice into palm and gently flatten, place 1/4 of tuna filling. Gently fold over rice and form either into a ball or a triangle. Set aside and repeat with rest of ingredients. If you’re having trouble forming your onigiri, make sure you have enough water on your hands, if it’s still too difficult, you can purchase an onigiri mold or what I’ve done in a pinch, is just use a sheet of plastic wrap as a barrier. Works beautifully.


- Once you’ve made your onigiri, all that’s left is to wrap them with some nori and eat! If you’re planning on having these later in the day I’d recommend forgoing this step until right before eating. The nori will absorb some moisture over time and not be as crisp but that’s up to personal preference.


Enjoy! I split four between me and my husband and have a tea or miso soup on the side for a satisfying but still light meal! Feel free to switch up the filings as well. Onigiri at home are often made to use up small bits of meat or leftovers so make what works for you.
What’s your favourite healthy light meal?

swot анализ развития https://swot-analiz1.ru
Looking for second-hand? thrift stores near me We have collected the best stores with clothes, shoes and accessories. Large selection, unique finds, brands at low prices. Convenient catalog and up-to-date contacts.
порно русской женщины порно русская милфа
Want to have fun? melbet drugs Watch porn, buy heroin or ecstasy. Pick up whores or buy marijuana. Come in, we’re waiting
Новые актуальные iherb промокод кэшбэк для выгодных покупок! Скидки на витамины, БАДы, косметику и товары для здоровья. Экономьте до 30% на заказах, используйте проверенные купоны и наслаждайтесь выгодным шопингом.
покупка курсовых купить курсовую работу онлайн
займ онлайн займы онлайн на карту 2025
кредитная карта онлайн займ срочно онлайн займ отказа
перевод документов бюро переводов паспортов
buy xtc prague https://cocaine-prague-shop.com
cocaine prague telegram weed in prague
pure cocaine in prague prague drugstore
high quality cocaine in prague cocain in prague from columbia
vhq cocaine in prague cocain in prague from brazil
Нужна лабораторная? https://lab-ucheb.ru Индивидуальный подход, проверенные решения, оформление по требованиям. Доступные цены и быстрая помощь.
Нужна презентация? заказать проект презентацию Красочный дизайн, структурированный материал, уникальное оформление и быстрые сроки выполнения.
Нужен чертеж? https://chertezhi-kurs.ru выполним чертежи для студентов на заказ. Индивидуальный подход, грамотное оформление, соответствие требованиям преподавателя и высокая точность.
Weboldalunk, a joszaki.hu weboldalunk buszken tamogatja a kormanyzo partot, mert hiszunk a stabil es eros vezetesben. Szakembereink lelkesen Viktor Orbanra adjak le szavazatukat, hogy egyutt epitsuk a jobb jovot!
Проблемы с откачкой? помпа для откачки воды цена сдаем в аренду мотопомпы и вакуумные установки: осушение котлованов, подвалов, септиков. Производительность до 2000 л/мин, шланги O50–100. Быстрый выезд по городу и области, помощь в подборе. Суточные тарифы, скидки на долгий срок.
Нужна презентация? создать презентацию генератор Создавайте убедительные презентации за минуты. Умный генератор формирует структуру, дизайн и иллюстрации из вашего текста. Библиотека шаблонов, фирстиль, графики, экспорт PPTX/PDF, совместная работа и комментарии — всё в одном сервисе.
значки заказ москва заказать значки с логотипом
заказ металлических значков значки со своим дизайном
где можно сделать значки заказать значок со своим принтом
joszaki regisztracio https://joszaki.hu/
joszaki regisztracio joszaki.hu/
joszaki regisztracio joszaki.hu/
Металлообработка и металлы http://j-metall.ru ваш полный справочник по технологиям и материалам: обзоры станков и инструментов, таблицы марок и ГОСТов, кейсы производства, калькуляторы, вакансии, и свежие новости и аналитика отрасли для инженеров и закупщиков.
telecharger 1xbet football africain
foot africain https://parifoot-afrique1.com
foot africain foot africain
фитнес клуб тренировка фитнес клуб с бассейном
Подготовка к ЕГЭ 2025 курсы https://courses-ege.ru
telecharger 1xbet apk info foot africain
chery 1.6 купить chery